3.1.2.2. Debugging U-Boot and SPL
Debugging SPL is important for bug fixes, new features, and better understanding of the boot process. The AM62x primary boot flow starts on TIFS, which boots R5 and later A53. Refer to Boot Flow for more info. OpenOCD/GDB and CCS are useful tools to debug source code modifications at very early stages of the boot process, even at initial chip reset when nothing has printed to the console by the device. The below example is useful to understand how to properly debug at these early stages.
Note
This guide uses the AM62x, though the process is very similar to other TI K3 devices.
3.1.2.2.1. Debug Example
This example uses OpenOCD/GDB and CCS on a Linux host machine to debug SPL on the SK-AM62B-P1 board, hooking in to either the board_init_f() function or upon R5 or A53 processor reset.
3.1.2.2.1.1. Setup
First, ensure you’re able to:
Clone, access, and modify the ti-u-boot source code: Getting the U-Boot Source Code
Build u-boot: Build U-Boot
Create an SD card: Create SD Card
Boot up and interface with the SK-AM62B-P1 board: AM62x_EVM_Hardware_Setup
before continuing with the below debugging example.
Note
Most newer SoCs will block any access to the sysctrl core, and SE devices will deny any JTAG access unless the user adds a debug entry into the tiboot3 cert or modifies some pins. The security variant of the device you use will determine which core you have access to via the JTAG interface.
Add a debug dead loop:
Option A: in the board_init_f() function in the
am625_init.csource code file:Open the
am625_init.csource code at the file path:ti-u-boot/arch/arm/mach-k3/am62x/am625_init.cAdd a debug dead loop in board_init_f():
diff --git a/arch/arm/mach-k3/am62x/am625_init.c b/arch/arm/mach-k3/am62x/am625_init.c
index 9a5eb6e4724..347421543ee 100644
--- a/arch/arm/mach-k3/am62x/am625_init.c
+++ b/arch/arm/mach-k3/am62x/am625_init.c
@@ -198,6 +198,26 @@ void board_init_f(ulong dummy)

        ctrl_mmr_unlock();

+       asm("test: nop");
+       asm("       nop");
+       asm("  b test ");
+       asm(" nop");
+       asm(" nop");
+
+       if (IS_ENABLED(CONFIG_CPU_V7R)) {
+               volatile int x = 1;
+               while(x) {
+                       asm("nop");
+               }
+       }
+
+       if (IS_ENABLED(CONFIG_ARM64)) {
+               volatile int x = 1;
+               while(x) {
+                       asm("nop");
+               }
+       }
+
        /* Init DM early */
        spl_early_init();
These dead loops are in both in-line assembly and C. The first dead loop (shown with asm in-line assembly) will run on every processor. The second dead loop (shown as two if statement blocks) will only run on the specific processor: R5 (CONFIG_CPU_V7R) or A53 (CONFIG_ARM64).
Option B: at R5 or A53 processor reset in the
start.Ssource code file:Open the
start.Ssource code at the file path:R5:
ti-u-boot/arch/arm/cpu/armv7/start.SA53:
ti-u-boot/arch/arm/cpu/armv8/start.SAdd a debug dead loop at reset:
R5:
diff --git a/arch/arm/cpu/armv7/start.S b/arch/arm/cpu/armv7/start.S
index b63481b43ca..4805e59da7d 100644
--- a/arch/arm/cpu/armv7/start.S
+++ b/arch/arm/cpu/armv7/start.S
@@ -37,6 +37,9 @@
 #endif

 reset:
+dead_loop:
+       nop
+       b       dead_loop
        /* Allow the board to save important registers */
        b       save_boot_params
 save_boot_params_ret:
A53:
diff --git a/arch/arm/cpu/armv8/start.S b/arch/arm/cpu/armv8/start.S
index d3a8a7c4787..4622f8d3c38 100644
--- a/arch/arm/cpu/armv8/start.S
+++ b/arch/arm/cpu/armv8/start.S
@@ -53,6 +53,9 @@ _bss_end_ofs:
        .quad   __bss_end - _start

 reset:
+dead_loop:
+       nop
+       b       dead_loop
        /* Allow the board to save important registers */
        b       save_boot_params
 .globl save_boot_params_ret
These dead loops are in assembly and are specific to the R5 or A53 processor in the AM62x, based on which
start.Sfile you opened and modified above.
Note
The location of a debug dead loop on all platforms will vary based on the section of the SPL we are trying to debug.
Move the modified u-boot binaries to the SD card:
After building u-boot, on AM62x, copy/replace the
tiboot3.bin,tispl.bin, andu-boot.imgu-boot binaries to the SD card’s boot partition and insert the SD card in the board.Power on the SK-AM62B-P1 board:
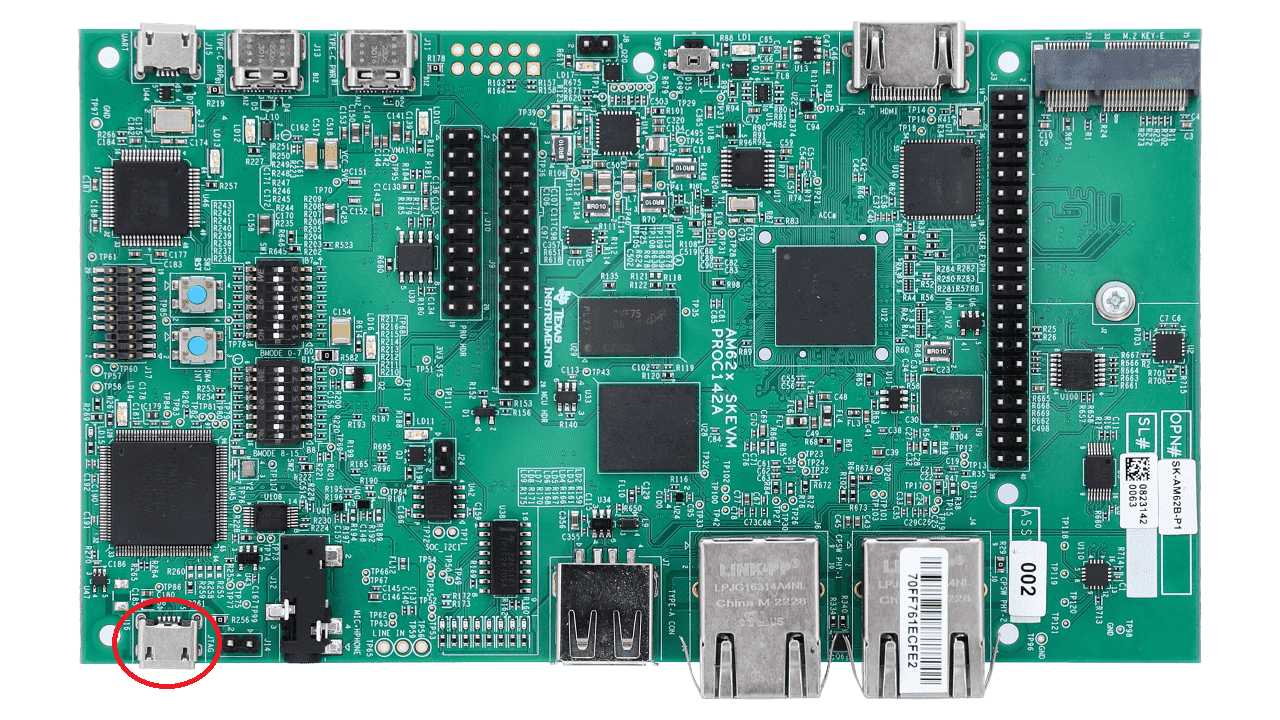
With a micro-USB cable, plug in the board to the host machine via the JTAG XDS110 port:
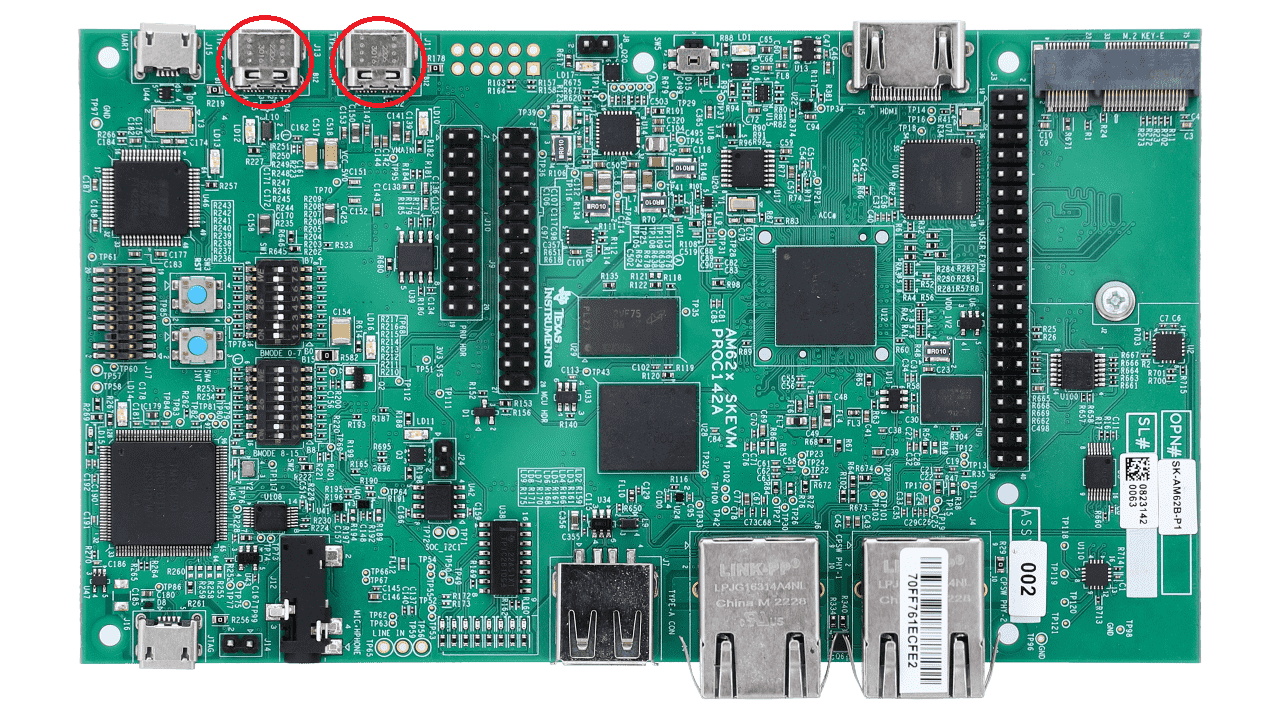
With a USB-C cable, plug in the board to power using either USB-C port:
3.1.2.2.1.2. Using OpenOCD & GDB
OpenOCD and GDB are useful command-line tools used for debugging on embedded systems. Here, OpenOCD communicates with JTAG, and GDB communicates with OpenOCD.
Connect to the SK-AM62B-P1 board using OpenOCD (board connected via JTAG XDS110 and powered on):
$ openocd -f ~/openocd/tcl/board/ti_am625evm.cfg
Open On-Chip Debugger 0.12.0+dev-01925-g169d463a3 (2025-04-04-11:08)
Licensed under GNU GPL v2
.
.
Info : Listening on port 6666 for tcl connections
Info : Listening on port 4444 for telnet connections
Info : XDS110: connected
.
.
Info : XDS110: connected to target via JTAG
.
.
Info : JTAG tap: am625.cpu tap/device found: 0x0bb7e02f (mfg: 0x017 (Texas Instruments), part: 0xbb7e, ver: 0x0)
Info : [am625.axi_ap] Examination succeed
Info : [am625.cpu.sysctrl] starting gdb server on 3333
Info : Listening on port 3333 for gdb connections
Info : [am625.cpu.a53.0] starting gdb server on 3334
Info : Listening on port 3334 for gdb connections
Info : [am625.cpu.a53.1] starting gdb server on 3335
Info : Listening on port 3335 for gdb connections
Info : [am625.cpu.a53.2] starting gdb server on 3336
Info : Listening on port 3336 for gdb connections
Info : [am625.cpu.a53.3] starting gdb server on 3337
Info : Listening on port 3337 for gdb connections
Info : [am625.cpu.main0_r5.0] starting gdb server on 3338
Info : Listening on port 3338 for gdb connections
Info : [am625.cpu.gp_mcu] starting gdb server on 3339
Info : Listening on port 3339 for gdb connections
Info : [am625.axi_ap] gdb port disabled
.
.
We see that OpenOCD is listening for connections via JTAG XDS110 on ports 3333-3339, which refers to the cores on the AM62x SoC we can specifically debug with OpenOCD. The am625 prefix refers to the SoC. am625.cpu.main0_r5.0 refers to an R5 core, and am625.cpu.a53.0 refers to an A53 core.
Leave the OpenOCD terminal running and open a separate terminal to connect GDB and debug:
Option A: on R5 (for this example) in the board_init_f() function in the
am625_init.csource code file:Add the symbol file that came from building u-boot and connect to the R5 core with GDB:
$ gdb-multiarch
GNU gdb (Ubuntu 12.1-0ubuntu1~22.04.2) 12.1
Copyright (C) 2022 Free Software Foundation, Inc.
.
.
(gdb) add-symbol-file ti-u-boot/out/r5/spl/u-boot-spl
add symbol table from file "ti-u-boot/out/r5/spl/u-boot-spl"
(y or n) y
Reading symbols from ti-u-boot/out/r5/spl/u-boot-spl...
(gdb) target extended-remote localhost:3338
Remote debugging using localhost:3338
warning: No executable has been specified and target does not support
determining executable automatically.  Try using the "file" command.
board_init_f (dummy=<optimized out>) at /home/${USER}/ti-u-boot/arch/arm/mach-k3/am62x/am625_init.c:201
201            asm("test: nop");
(gdb)
We see that the OpenOCD terminal is still running, and it updates as GDB communicates with the R5 core on the board via OpenOCD. Here, port 3338 targets am625.cpu.main0_r5.0.
Note
On other devices, the
u-boot-splsymbol file may be located in a different directory upon building u-boot.Use GDB debugging commands to debug SPL:
(gdb) tui enable
(gdb) layout src
(gdb) <Ctrl + X>
<2>
(gdb) <Ctrl + X>
<2>
(gdb) next
(gdb) step
(gdb) info registers pc
pc             0x43c00ab2             0x43c00ab2 <board_init_f+274>
(gdb) set $pc += 2
(gdb) continue
Continuing.
<Ctrl + C>

Program received signal SIGINT, Interrupt.
board_init_f (dummy=<optimized out>) at /home/${USER}/ti-u-boot/arch/arm/mach-k3/am62x/am625_init.c:209
(gdb) b spl_mmc_boot_mode
Breakpoint 1 at 0x43c00cec: file /home/${USER}/ti-u-boot/arch/arm/mach-k3/am62x/am625_init.c, line 333.
(gdb) set x = 0
(gdb) continue
Continuing.

Breakpoint 1, spl_mmc_boot_mode (mmc=0x43c34788, boot_device=8) at /home/${USER}/ti-u-boot/arch/arm/mach-k3/am62x/am625_init.c:333
(gdb) next
(gdb) step
(gdb) tui disable
(gdb) q
A debugging session is active.

   Inferior 1 [Remote target] will be detached.

Quit anyway? (y or n) y
Detaching from pid Remote target
[Inferior 1 (Remote target) detached]
An easy way to break the loop is to change the program counter (either dead loop) or set x = 0 (in the second dead loop).
Option B: at A53 processor reset (for this example) in the
start.Ssource code file:Add the symbol file that came from building u-boot and then connect to the A53 core with GDB:
$ gdb-multiarch
GNU gdb (Ubuntu 12.1-0ubuntu1~22.04.2) 12.1
Copyright (C) 2022 Free Software Foundation, Inc.
.
.
(gdb) add-symbol-file ti-u-boot/out/a53/spl/u-boot-spl
add symbol table from file "ti-u-boot/out/a53/spl/u-boot-spl"
(y or n) y
Reading symbols from ti-u-boot/out/a53/spl/u-boot-spl...
(gdb) target extended-remote localhost:3334
Remote debugging using localhost:3334
warning: No executable has been specified and target does not support
determining executable automatically.  Try using the "file" command.
reset () at /home/${USER}/ti-u-boot/arch/arm/cpu/armv8/start.S:57
57             nop
(gdb)
We see that the OpenOCD terminal is still running, and it updates as GDB communicates with the A53 core on the board via OpenOCD. Here, port 3334 targets am625.cpu.a53.0.
Use GDB debugging commands to debug SPL:
(gdb) tui enable
(gdb) layout src
(gdb) <Ctrl + X>
<2>
(gdb) <Ctrl + X>
<2>
(gdb) next
(gdb) step
(gdb) info registers pc
pc             0x80080028             0x80080028 <reset>
(gdb) set $pc += 8
(gdb) info registers pc
pc             0x80080030             0x80080030 <reset+8>
(gdb) b save_boot_params
Breakpoint 1 at 0x800800e8: file /home/${USER}/ti-u-boot/arch/arm/cpu/armv8/start.S, line 390.
(gdb) continue
Continuing.

Breakpoint 1, save_boot_params () at /home/${USER}/ti-u-boot/arch/arm/cpu/armv8/start.S:390
(gdb) next
(gdb) next
(gdb) nexti
(gdb) next
save_boot_params_ret () at /home/${USER}/ti-u-boot/arch/arm/cpu/armv8/start.S:123
(gdb) next
(gdb) nexti
(gdb) tui disable
(gdb) q
A debugging session is active.

   Inferior 1 [Remote target] will be detached.

Quit anyway? (y or n) y
Detaching from pid Remote target
[Inferior 1 (Remote target) detached]
An easy way to break the loop is to change the program counter.
Refer to the U-Boot K3 OpenOCD/GDB documentation for more info.
3.1.2.2.1.3. Using CCS
CCS is a useful GUI IDE with a built-in debugger for embedded systems. To debug, CCS communicates with JTAG.
Download, install, setup, and open CCS (Linux).
Note
This guide uses CCS 12.x. Remember, we will be building U-Boot on a Linux host machine, so it is also recommended to install CCS on Linux. Refer to the Linux CCS host support if needed.
Create a new target configuration file:
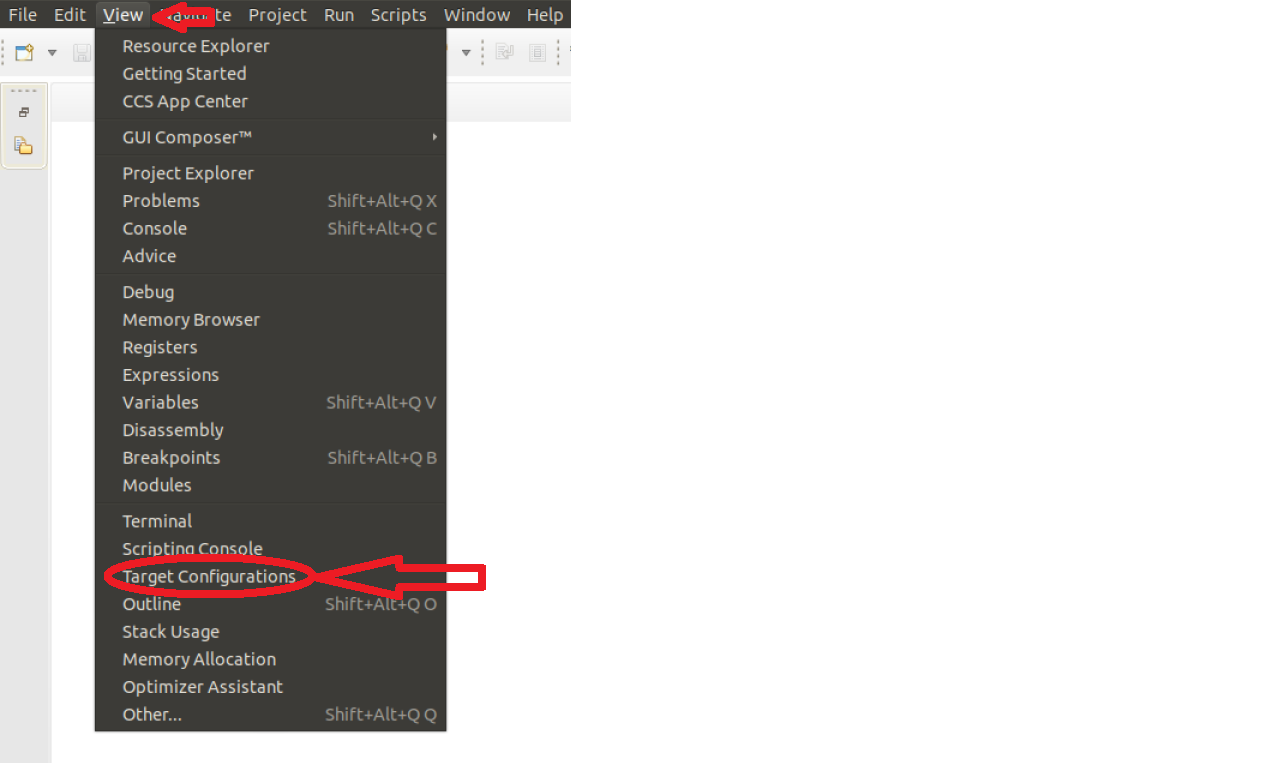
Navigate to “View” -> “Target Configurations”:
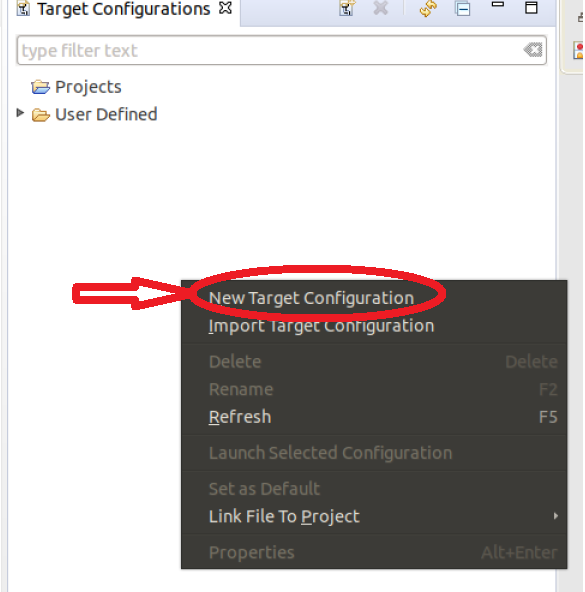
Right-click on the “Target Configurations” window and select “New Target Configuration”:
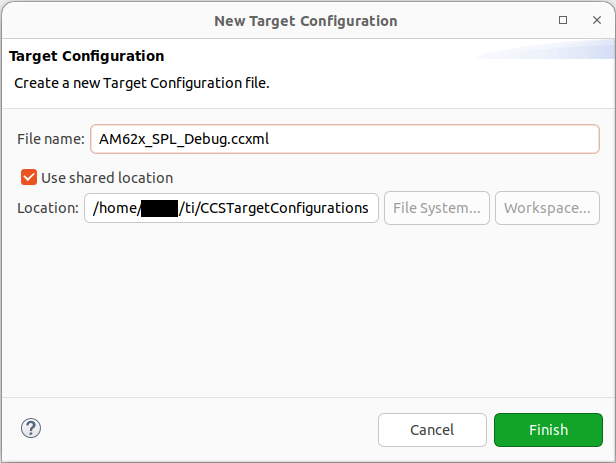
Create a name for the new target configuration:
Select the appropriate JTAG and SoC, then click “Save” and “Test Connection”:
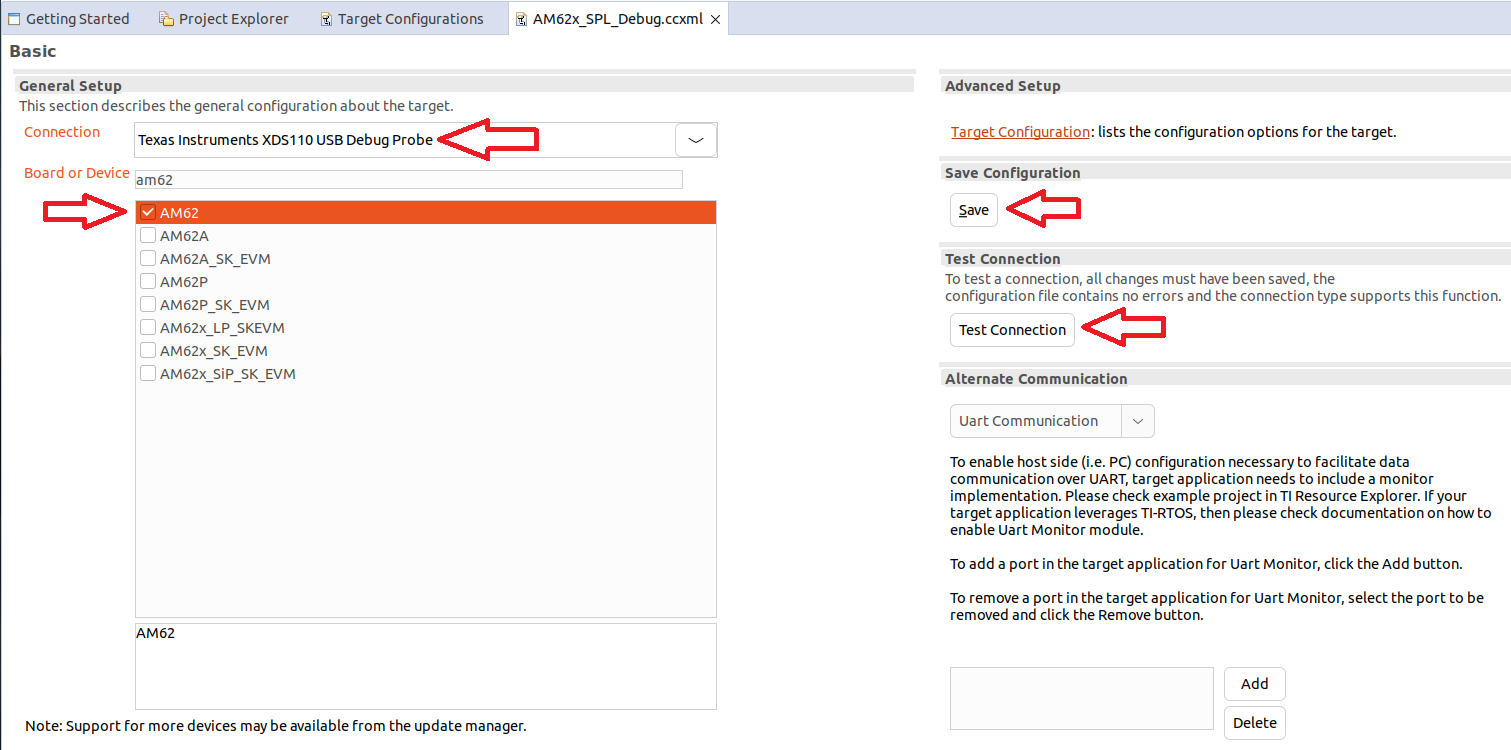
Note
If we select the SoC name, the GEL files will not be loaded. However, if we select the board options, the GEL files will be loaded by default. In the above example if “AM62x_SK_EVM” is selected, the GEL files are automatically enabled in the configuration. While debugging U-Boot, it is recommended to avoid GEL files because U-Boot is responsible for initializing the peripherals.
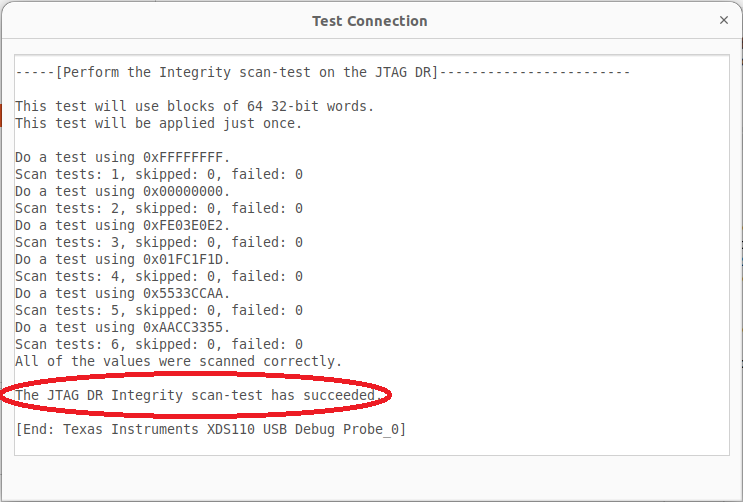
Ensure CCS is able to communicate with the debugger:
If “Test Connection” results in an error:
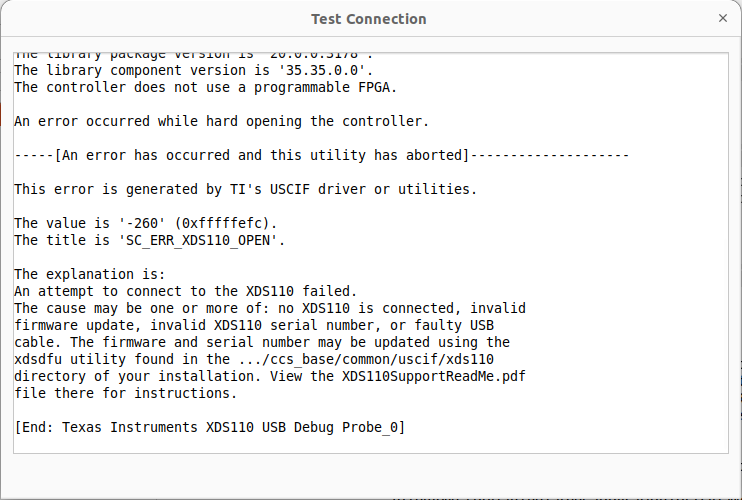
Run these commands a terminal window:
$ ./ti/ccs1281/ccs/ccs_base/common/uscif/xds110/xdsdfu -e
$ ./ti/ccs1281/ccs/ccs_base/common/uscif/xds110/xdsdfu -m
$ ./ti/ccs1281/ccs/ccs_base/common/uscif/xds110/xdsdfu -f ./ti/ccs1281/ccs/ccs_base/common/uscif/xds110/firmware_3.0.0.32.bin -r
Note
The last command may take time depending on your host machine’s performance. The file path may change with future CCS versions.
Load symbol files:
Launch the target configuration file created previously:
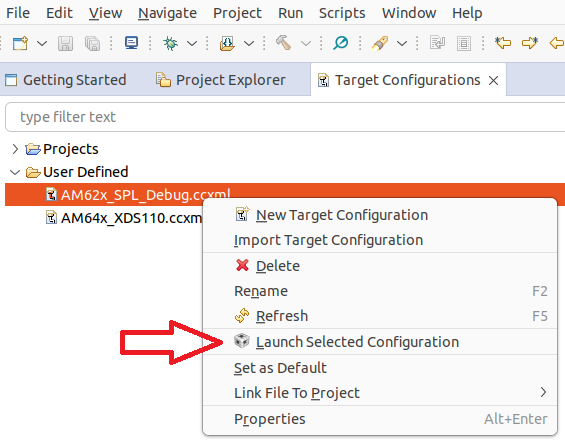
If “Launch Selected Configuration” results in an error:
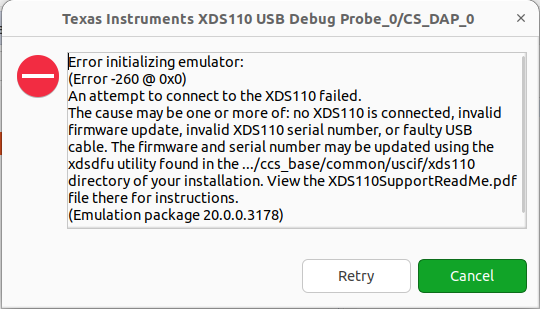
Run these commands a terminal window:
$ ./ti/ccs1281/ccs/ccs_base/common/uscif/xds110/xdsdfu -e
$ ./ti/ccs1281/ccs/ccs_base/common/uscif/xds110/xdsdfu -m
$ ./ti/ccs1281/ccs/ccs_base/common/uscif/xds110/xdsdfu -f ./ti/ccs1281/ccs/ccs_base/common/uscif/xds110/firmware_3.0.0.32.bin -r
Note
The last command may take time depending on your host machine’s performance. The file path may change with future CCS versions.
After successful launch, connect to one of the ARM cores:
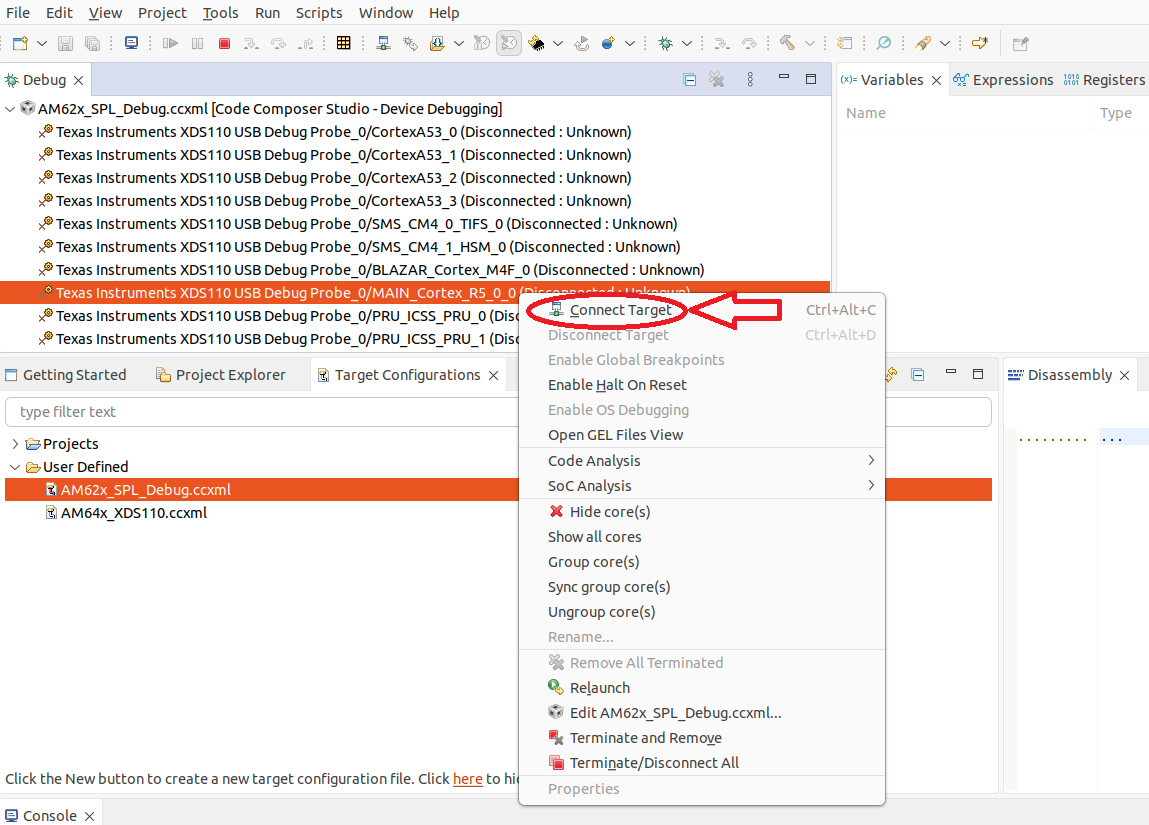
Note
On AM62x, the inital SPL code is executed on the R5, so the user would connect to the R5 core.
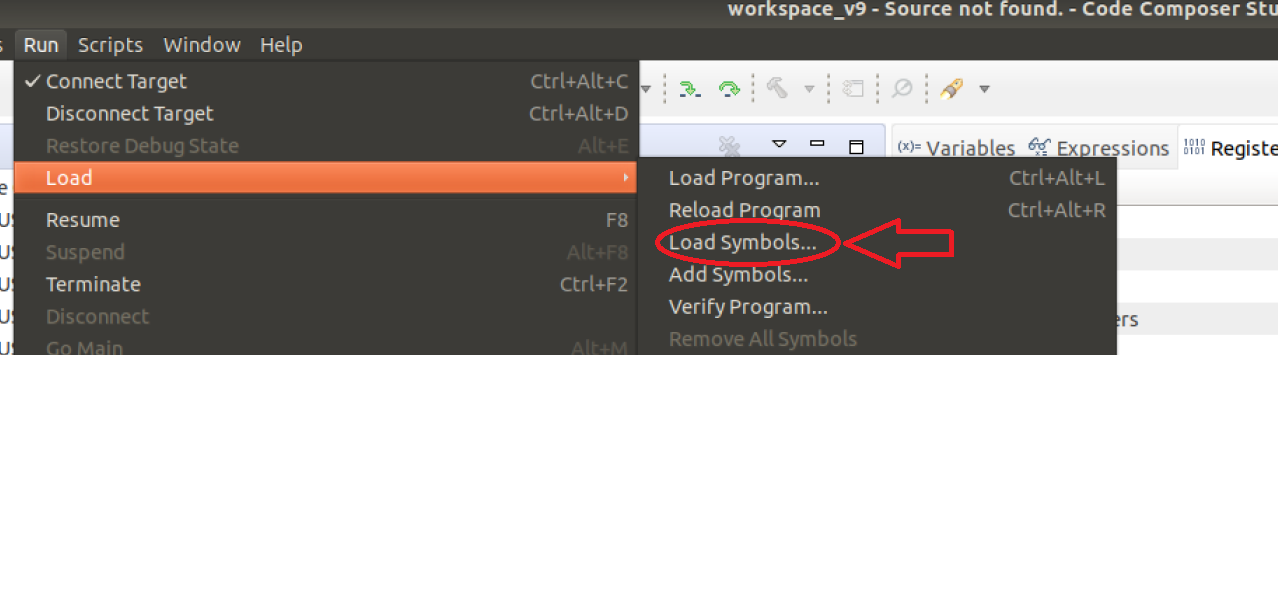
After connecting to the core:
Click on “Run” -> “Load” -> “Load Symbols…”:
Click “Browse”:

Click
u-boot-splwith no file extension (you may have to change the file type to “All Files”):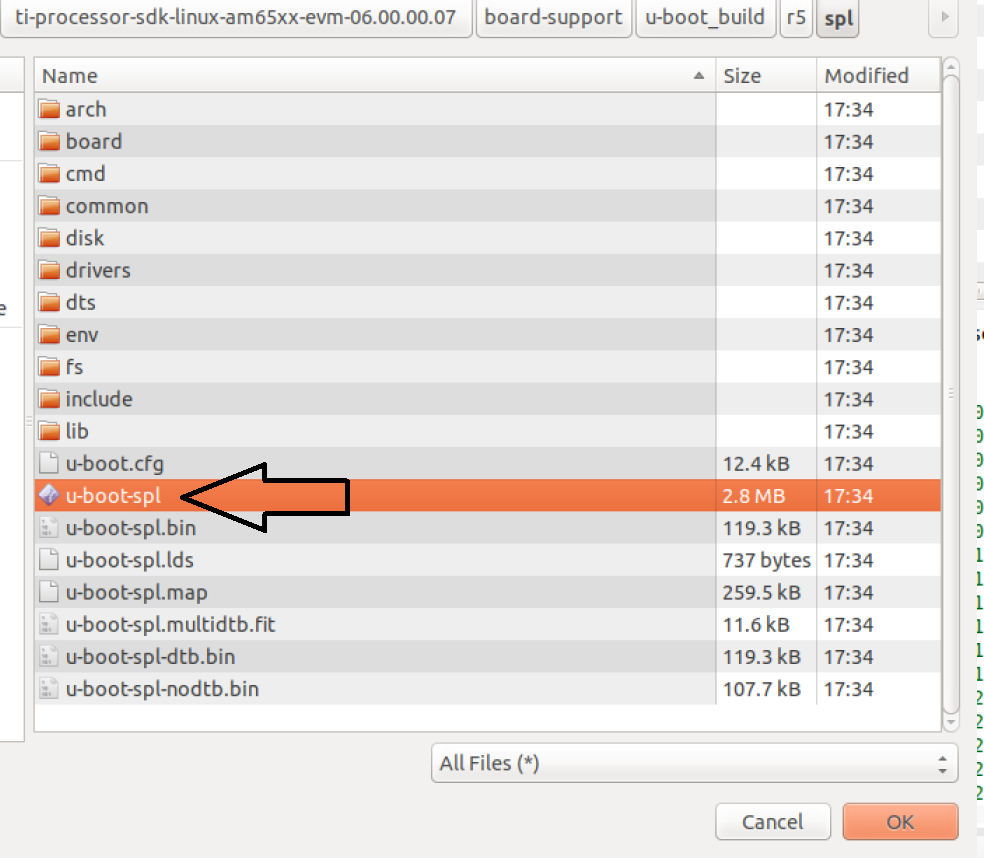
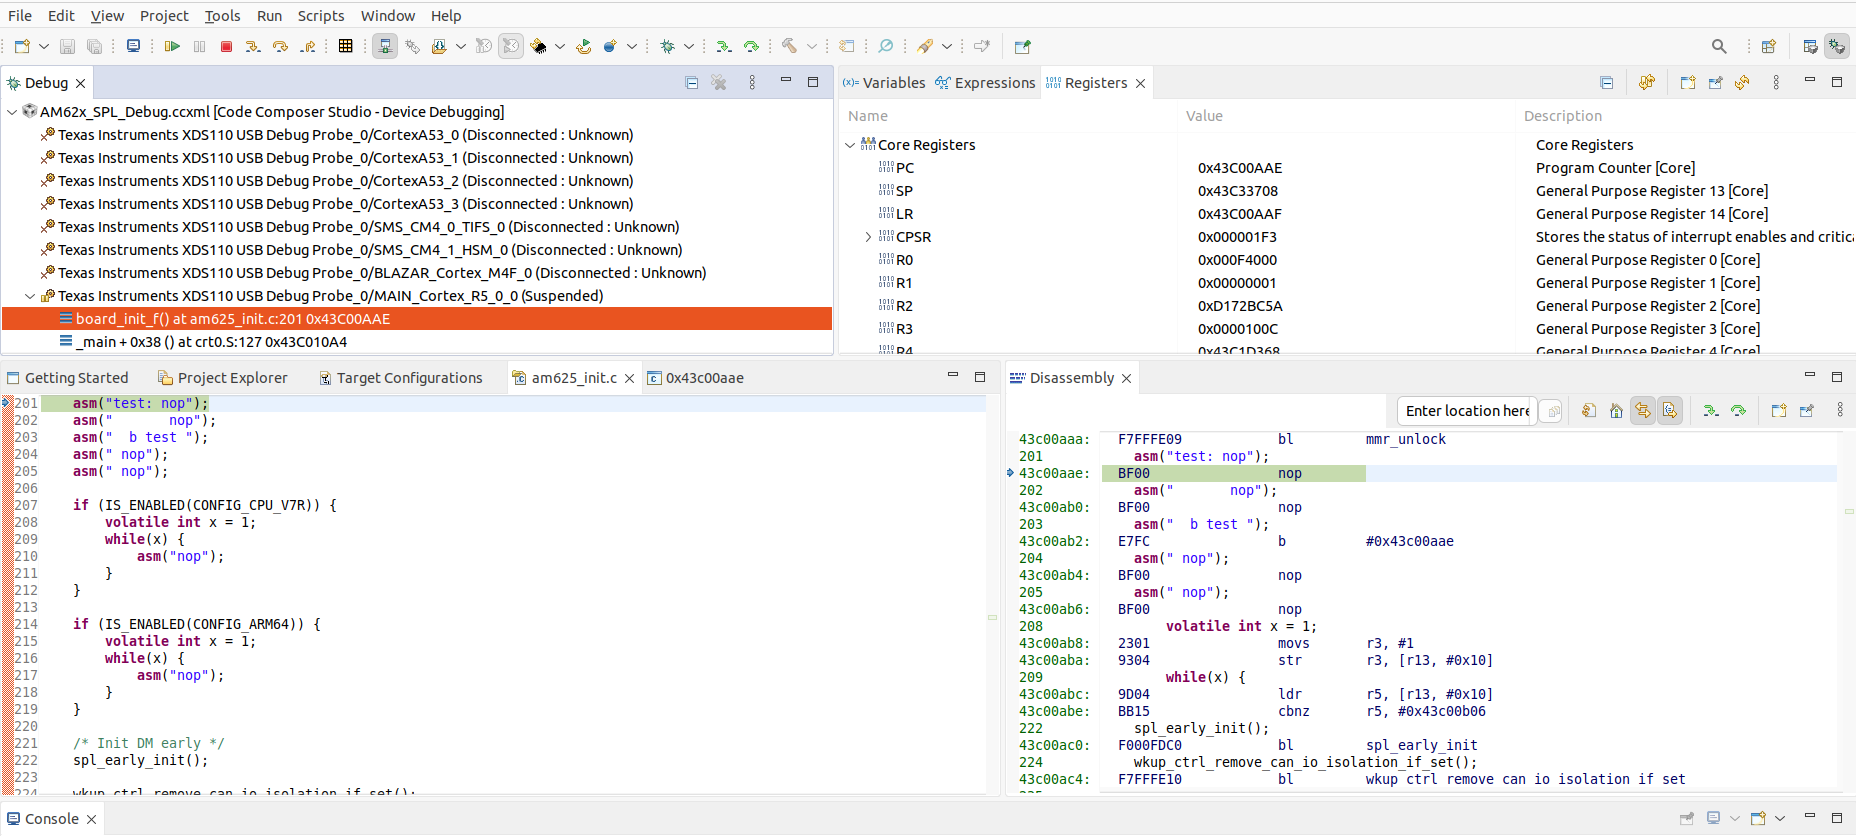
After loading the symbol file, CCS should find the source code file stuck at the added debug dead loop:
To break out of the loop, change the program counter in the “Register” window:
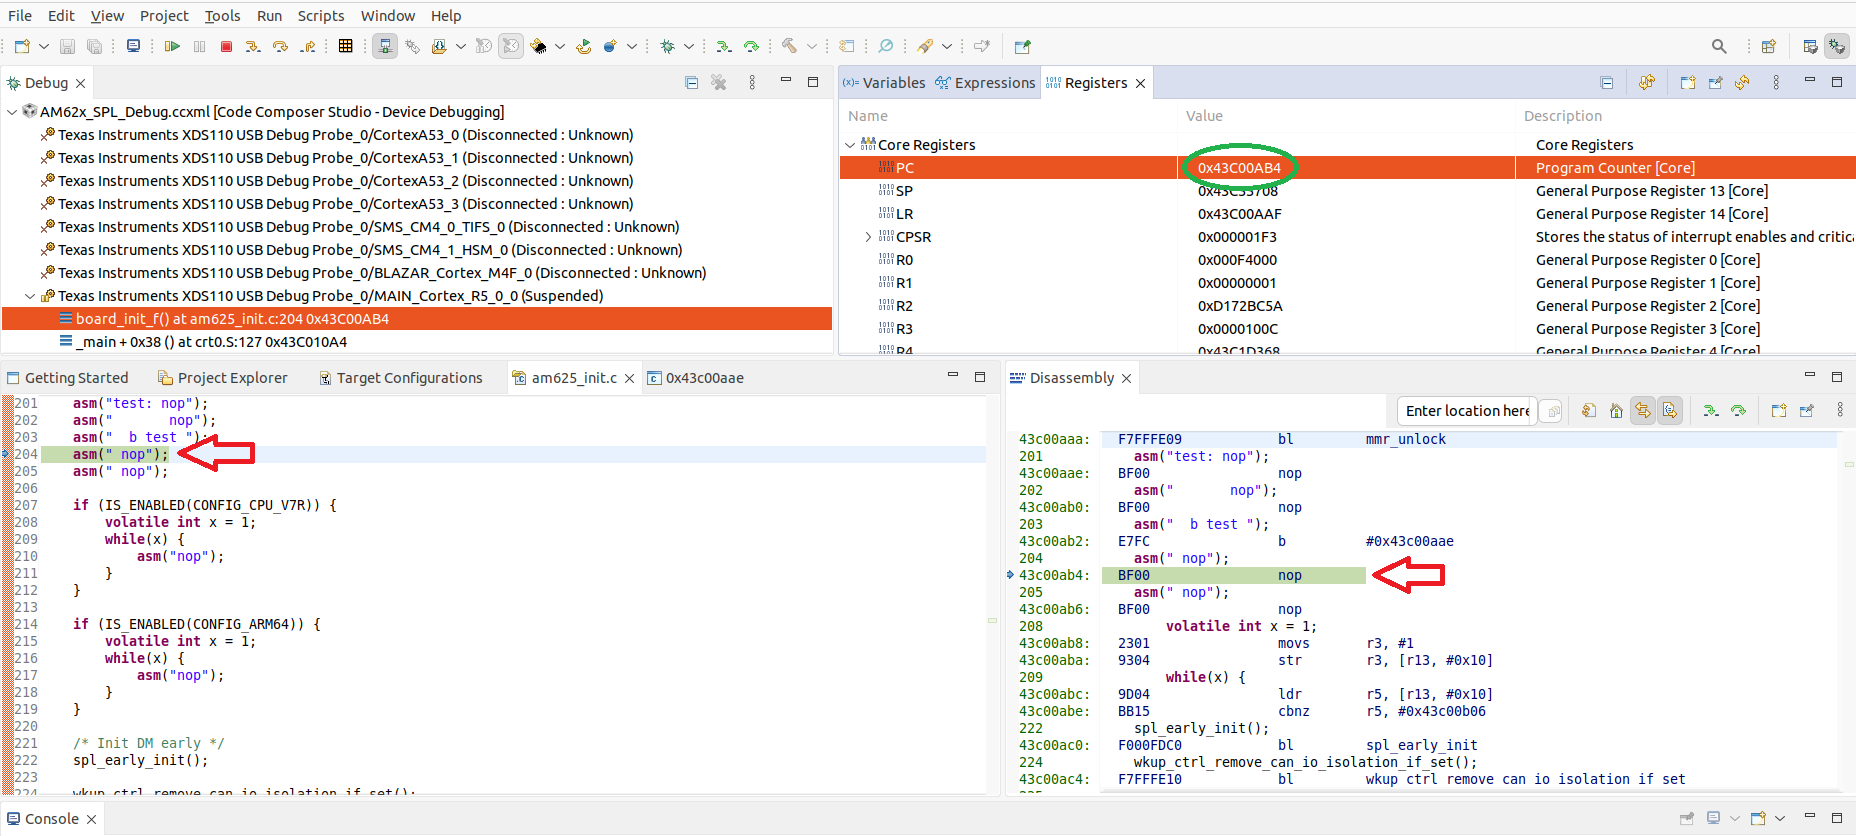
At this point, the user can break out of the second dead loop (two if statement blocks) by either also changing the PC or changing the “x” variable in the “Variables” window in CCS. Then, the user has the ability to step through the SPL code and debug issues in the SPL.
Note
If the debug session resets, it may be due to the watchdog timer. Refer to this U-Boot Warning for more info.