3.6.3. Flash via Fastboot
This application note provides instructions on using Snagfactory tool for flashing.
The Snagfactory tool has two main operations:
Snagrecover: Boots the board (recovery) using USB DFU.
Snagflash: Flashes binaries to the on-board memory using the Fastboot protocol.
This tool supports flashing multiple boards simultaneously, enhancing efficiency in producion enviroment.
3.6.3.1. Installing Snagfactory
Snagfactory tool is hosted here Snagfactory.
More info about installation can be found in Snagfactory Readme.
Snagfactory also is available on pip.
$ python3 -m pip install --user snagboot
$ python3 -m pip install --user snagboot[gui]
Note
At the time of 11.2 release, the corresponding Snagfactory version was v2.5.
3.6.3.2. Building bootloader binaries for Recovery
For Snagrecover, bootloader images must support DFU boot and fastboot download.
In addition to USB DFU fragment config (which enables DFU boot) for the u-boot
build, an additional fragment config am6x_a53_snagfactory.config needs to be
used, which enables fastboot support in U-Boot and other required configs for
snagfactory.
To build bootloader images for recovery using SDK, following change is needed
in Rules.make file present in the top level of Linux SDK Installer.
UBOOT_MACHINE_R5=am62x_evm_r5_defconfig am62x_r5_usbdfu.config

UBOOT_MACHINE_A53=am62x_evm_r5_defconfig am62x_a53_usbdfu.config am6x_a53_snagfactory.config

# For AM62X LP

UBOOT_MACHINE_R5=am62x_lpsk_r5_defconfig am62x_r5_usbdfu.config

UBOOT_MACHINE_A53=am62x_lpsk_a53_defconfig am62x_a53_usbdfu.config am6x_a53_snagfactory.config

# For AM62X SIP

UBOOT_MACHINE_R5=am62xsip_evm_r5_defconfig am62x_r5_usbdfu.config

UBOOT_MACHINE_A53=am62xsip_evm_a53_defconfig am62x_a53_usbdfu.config am6x_a53_snagfactory.config
Generate the bootloader images using top-level makefile by running following commands on the terminal from the top-level of the Linux SDK installer.
$ make u-boot_clean
$ make u-boot
$ make u-boot_stage
Save the bootloader binaries generated in a separate directory. These bootloader
images will be used for recovery and to start flashing the images. The bootloader
images after make can be found in board-support/built-images.
For more details regarding USB DFU refer USB Device Firmware Upgrade (DFU).
Note
CONFIG_FASTBOOT_BUF_SIZE is defined in am6x_a53_snagfactory.config
and specifies the maximum buffer size for flashing files. Its value must be equal
or greater than the largest file size being flashed. If smaller, non-sparse
images will not flash correctly due to issues with chunked processing.
3.6.3.3. Connections
Power off the EVM and set up the boot mode switches to boot from USB DFU.
SW2-11001100
SW3-00000000
Power on the board.
Optionally you can also connect host PC to board via UART to read the console logs.
3.6.3.3.1. How to use Snagfactory
Comprehensive instructions for installation of the Snagfactory tool are here:
SnagFactory GUI Tool Configuration and Device Flashing Procedure
The tool currently supports MMC and MTD backends for flashing images.
Note
SnagFactory GUI tool is a prerequisite for this procedure.
The following steps outline the process for configuring and flashing a device by using the SnagFactory GUI tool.
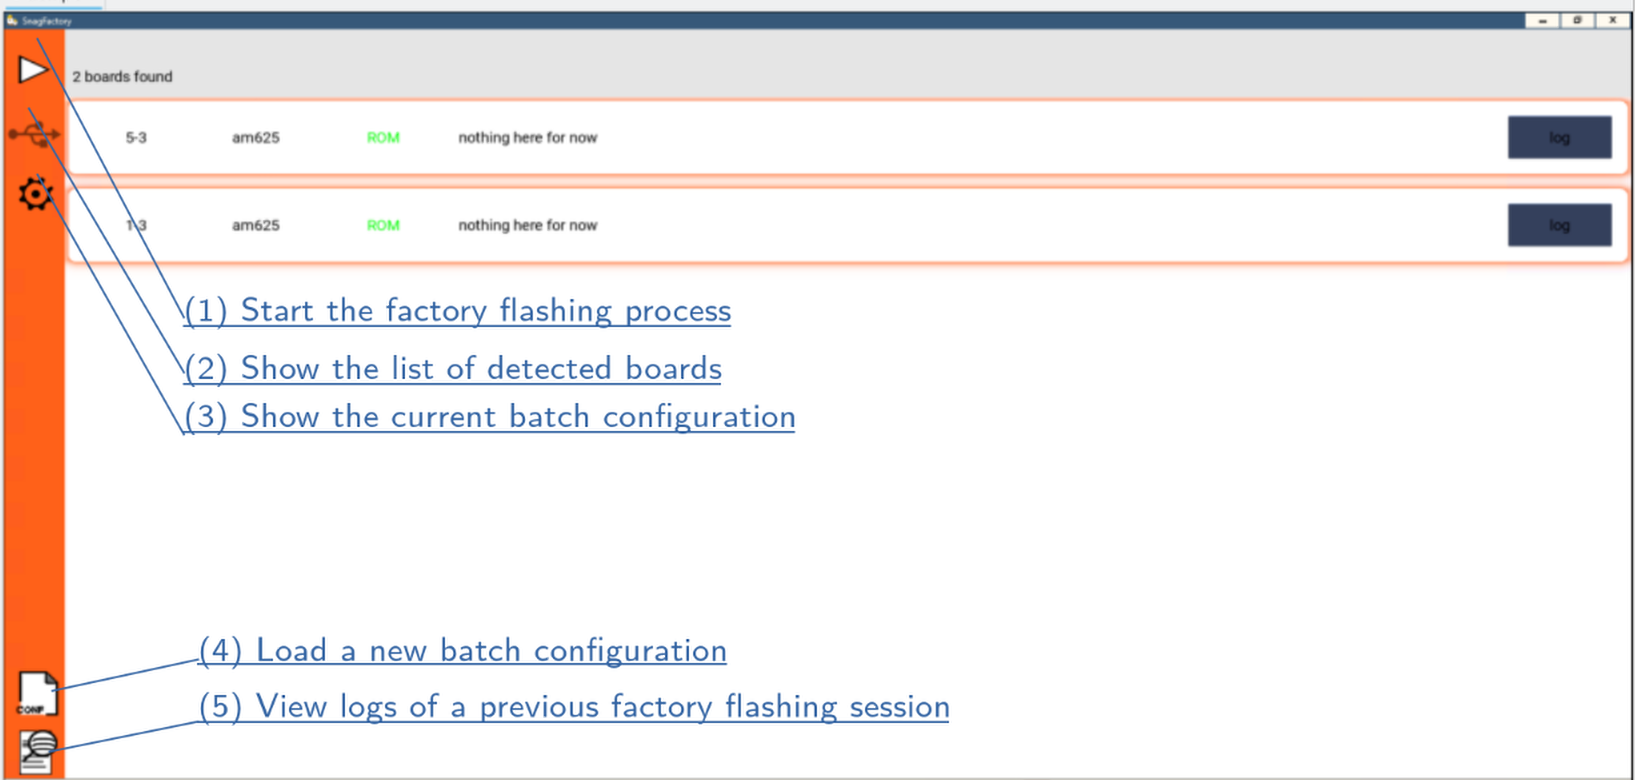
Step 1: Launch SnagFactory GUI Tool
Launch the SnagFactory GUI tool to begin the configuration and device flashing process.
$ snagfactory
Step 2: Select Configuration File Option
Upon launch, the SnagFactory GUI tool will present the option to add a configuration file. Select the conf option to proceed with loading the configuration file.
Step 3: Load YAML Configuration File
Load the YAML configuration file for the platform. This file has the necessary settings and parameters for the device flashing process.
Step 4: Flash the Device
Once you load the YAML configuration file, the SnagFactory GUI tool will flash the device with the specified configuration.
The following table outline the board names for snagfactory yaml configuration.
Evaluation Board |
Family |
board |
|---|---|---|
am62pxx-evm |
am6x |
am62p |
am62xx-evm |
am6x |
am625 |
am62lxx-evm |
am62lx |
am62l3 |
am62xx-lp-evm |
am6x |
am625 |
am62sip-evm |
am6x |
am625 |
am64xx-evm |
am6x |
am6442 |
am62dxx-evm |
am6x |
am62d2 |
The example configuration files for emmc and ospi-nand and ospi-nor are as follows.
For reference, the ospi-nor.yaml file for am62p platform can be as follows:
boards:
  0451:6165: am62p
soc-models:
  am62p-firmware:
    tiboot3:
      path: "<path_to_boot_binaries>/tiboot3.bin"
    tispl:
      path: "<path_to_boot_binaries>/tispl.bin"
    u-boot:
      path: "<path_to_boot_binaries>/u-boot.img"
  am62p-tasks:
  - eraseblk-size: 0x40000
    fb-buffer-addr: 0x82000000
    fb-buffer-size: 0x7000000
    target-device: nor0
  - task: run
    args:
      - "oem_run:mtd list"
      - "oem_run:setenv mtdids nor0=nor0"
  - task: mtd-parts
    args:
      - name: ospi.tiboot3
        size: 0x80000
      - name: ospi.tispl
        size: 0x200000
      - name: ospi.u-boot
        size: 0x400000
  - task: flash
    args:
      - image: "<path_to_flash_binaries>/tiboot3.bin"
        part: ospi.tiboot3
      - image: "<path_to_flash_binaries>/tispl.bin"
        part: ospi.tispl
      - image: "<path_to_flash_binaries>/u-boot.img"
        part: ospi.u-boot
For reference, the ospi-nand.yaml file for am62xx-lp platform can be as follows:
boards:
  0451:6165: am625
soc-models:
  am625-firmware:
    tiboot3:
      path: "<path_to_boot_binaries>/tiboot3.bin"
    tispl:
      path: "<path_to_boot_binaries>/tispl.bin"
    u-boot:
      path: "<path_to_boot_binaries>/u-boot.img"
  am625-tasks:
  - eraseblk-size: 0x40000
    fb-buffer-addr: 0x82000000
    fb-buffer-size: 0x7000000
    target-device: spi-nand0
  - task: run
    args:
      - "oem_run:mtd list"
      - "oem_run:setenv mtdids spi-nand0=spi-nand0"
  - task: mtd-parts
    args:
      - name: ospi_nand.tiboot3
        size: 0x80000
      - name: ospi_nand.tispl
        size: 0x200000
      - name: ospi_nand.u-boot
        size: 0x400000
      - name: ospi_nand.env
        size: 0x40000
      - name: ospi_nand.env.backup
        size: 0x40000
      - name: ospi_nand.rootfs
        size: 0x5fc0000
        start: 0x2000000
      - name: ospi_nand.phypattern
        start: 0x7fc0000
        size: 0x40000
  - task: flash
    args:
      - image: "<path_to_flash_binaries>/tiboot3.bin"
        part: ospi_nand.tiboot3
      - image: "<path_to_flash_binaries>/tispl.bin"
        part: ospi_nand.tispl
      - image: "<path_to_flash_binaries>/u-boot.img"
        part: ospi_nand.u-boot
For reference, the emmc.yaml file for am62p platform can be as follows:
boards:
  "0451:6165": "am62p"
soc-models:
  am62p-firmware:
      tiboot3:
        path: "<path_to_boot_binaries>/tiboot3.bin"
      tispl:
        path: "<path_to_boot_binaries>/tispl.bin"
      u-boot:
        path: "<path_to_boot_binaries>/u-boot.img"
  am62p-tasks:
    - target-device: mmc0
      fb-buffer-addr: 0x82000000
      fb-buffer-size: 0x7000000
    - task: gpt
      args:
        - name: rootfs
          size: 1G
    - task: reset
    - task: flash
      args:
        - image: "<path_to_flash_binaries>/tiboot3.bin"
          image-offset: 0x0
          part: "hwpart 1"
        - image: "<path_to_flash_binaries>/tispl.bin"
          image-offset: 0x80000
          part: "hwpart 1"
        - image: "<path_to_flash_binaries>/u-boot.img"
          image-offset: 0x280000
          part: "hwpart 1"
        - image: "<path_to_flash_binaries>/rootfs.ext4"
          part: "rootfs"
For reference, the emmc.yaml file for am62l platform can be as follows:
boards:
  "0451:6165": "am62l3"

soc-models:
  am62l3-firmware:
      tiboot3:
        path: "<path_to_boot_binaries>/tiboot3.bin"
      tispl:
        path: "<path_to_boot_binaries>/tispl.bin"
      u-boot:
        path: "<path_to_boot_binaries>/u-boot.img"

  am62l3-tasks:
    - target-device: mmc0
      fb-buffer-addr: 0x82000000
      fb-buffer-size: 0x7000000

    - task: gpt
      args:
        - name: rootfs
          size: 15G

    - task: reset

    - task: flash
      args:
        - image: "<path_to_flash_binaries>/tiboot3.bin"
          image-offset: 0x0
          part: "hwpart 1"
        - image: "<path_to_flash_binaries>/tispl.bin"
          image-offset: 0x80000
          part: "hwpart 1"
        - image: "<path_to_flash_binaries>/u-boot.img"
          image-offset: 0x280000
          part: "hwpart 1"
        - image: "<path_to_flash_binaries>/rootfs.ext4"
          part: "rootfs"
Snagboot Command-line Configuration and Device Flashing Procedure
Snagrecover uses vendor-specific ROM code mechanisms to initialize external RAM and run U-Boot, without modifying any non-volatile memories.
$ snagrecover -s am625 -F "{'tiboot3': {'path': 'tiboot3.bin'}}" -F "{'tispl': {'path': 'tispl.bin'}}" -F "{'u-boot': {'path': 'u-boot.img'}}"
Comprehensive instructions for using snagrecover command line are here: Snagrecover command line.
Snagflash communicates with U-Boot to flash system images to non-volatile memories, using either DFU, UMS or Fastboot.
$ snagflash -P fastboot-uboot -p 0451:6165 -i
Comprehensive instructions for using snagflash command line are here: Snagflash command line.